Previous post shows how to create Maven projects, package and deploy to either a standalone server or an embedded server, by directly using the Maven archetype; but since in practice, an IDE would be used for development, this post shows how to do the same using an IDE.
Intellij IDEA is used in this post. If using other IDEA (say Eclipse or NetBeans) you would have to consult the help section or online documentation for the corresponding steps in the IDE you use.
This post is adapted from Developing a Java EE application. A post which shows how to create and run a JEE web application, but it does not accomplish this with Maven and uses Glassfish as the application server instead of Tomcat which we are interested in.
What this post does is to modify the steps to include usage of Maven and then show steps on how to deploy to Tomcat
Before you start make sure that the following software is installed on your computer:
- IntelliJ IDEA ULTIMATE Edition.
- Java SE Development Kit (JDK), version 6 or later. Download Oracle JDK.
- Tomcat Server, version 7 or later. Download Tomcat and follow installation instructions
- Maven, version 3 or later. Download Maven and follow installation instruction
- A web browser.
Creating a project
- Click Create New Project on the Welcome screen, or select File | New | Project.
- The New Project wizard opens.
- In the left-hand pane, select Maven
- If the JDK that you want to use is already defined in IntelliJ IDEA, select that JDK from the Project SDK list and proceed to the next step.
- Otherwise, click New, select JDK, and select the JDK installation folder in the dialog that opens.

- Click next

- Fill in the GroupId, Artifactid, and Version
- Click Next
- Give the project a name and the project location
- Click Finish and wait while IntelliJ IDEA is creating the project.
When the project is created, you'll see something similar to this in the Project tool window.

sample-webapp is a module folder which contains the project. The .idea folder and the file sample-webapp.iml contains configuration data for our project and module respectively. The folder src is for the Java source code. It is worth mentioning that src/main/webapp is missing in the file system above. It can be added manually especially when you want to work with templating and also when you want to create an application that uses the web.xml (which would then be put in src/webapp/WEB-INF/web.xml) We won't be adding this directory (nor web.xml) as the illustration won't be making use of any files needed in the webapp directory. External Libraries include your JDK and the JAR files.
Add Maven Integration
- Click on View | Tools Window | Maven Projects
This would ensure that the Maven tool window shows by the right side

- Click on the settings icon
at the top in the Maven projects view.
- Make sure the Maven home directory, User settings file, and local repository all points to the right locations, which will depend on how and where you installed your Maven.
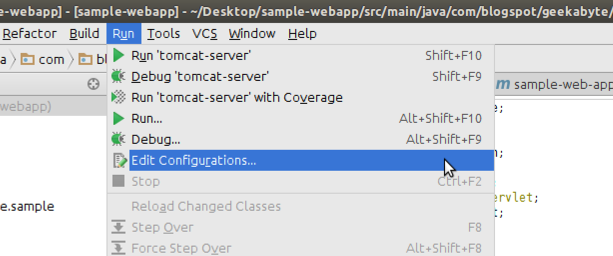
- Click on Run | Edit Configuration
- On the left, Click on
| Tomcat Server | Local

- This would bring up the configuration dialog

- Give the server a name.
- Click on Configure. This would bring up a dialog where you can set the Tomcat home and Tomcat base directory. Set them to point the appropriate location as determined on how Tomcat was installed on your computer.

- Click on Ok.
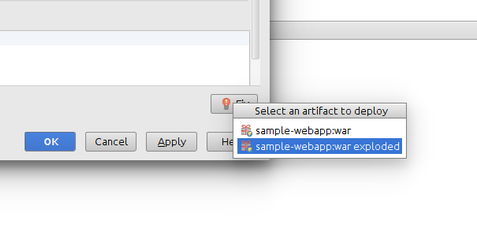
- Next thing is to configure how our application is to be deployed to Tomcat. IntelliJ will have to create the .war file from the source code in the project. To do this, Click on Fix by the right bottom side. This will allow you to select the .war to be deployed. Click on sample-webapp:war exploded
- Make sure the project is listed to be deployed on server start up. Take note also of the application context, which defaults to “/” This means your application when deployed to the server would be available at “http://localhost:8080//” if you want it to be deployed to another path, update the value in the application context.
- Click on ok to finish the configuration. You should see the configured server at the top of the IDE:
Updating Dependency and Plugin Settings
We would be using the servlet API, so we need to add it as a dependency. Also since we are using version 3.X of the APi which allows for the possibility to not have a web.xml file, we would have to configure the maven-war-plugin (which is used to package war files) to not fail when web.xml cannot be found. All these is done in the POM.xml. After the necessary updates, your pom.xml should look like this:

Developing source code
Our application will be a single Servlet. Its only function will be to output the text Hello World!
- Create a package in src/main/java. And create a Java file in it. In the screen shot HelloWorld.java is created inside the com.blogspot.geekabyte.sample package.
- Edit the HelloWorld.java to print out “Hello World”. We would be using the Servlet functionalities to do this. First we would need to annotate our class with @WebServlet(value=”/hello”) so as to map requests to “/hello” to it. Then we extend the HTTPServlet, and override the service method. The class should look like below:

Running the application
In the upper-right part of the workspace, click


IntelliJ IDEA compiles your source code and builds an application artifact. After that, the Run tool window opens at the bottom of the IDE. IntelliJ IDEA starts the server and deploys the artifact onto it.

Finally, in your default web browser navigate to http://localhost:8080/hello and you should see the following screen:

Packaging the application into a WAR file using Maven Integration
When you get to the stage when you are happy with your application, you may want to place it in a WAR (web application archive). You can use the Maven integration from within the IDE to do this.
- On the right sight, make sure the maven project pane is on view, then expand the lifecycle node, select package, and click on (or double click on package) as shown below:

- Maven will compile, build and package the project into a war file in the target directory inside your projects directory. The pane that shows at the bottom of the IDE when you run the package provides more information:

Next Post: Introduction to Spring Boot as a Servlet Based Web Application Framework
Previous Post: How to Create .war Files with Maven Archetypes and Deploy to Tomcat
Additional Resources
- Setup of Java project with Tomcat using IntelliJ Community Edition via Tomcat maven plugin
- Importing a Maven Project [Video]
No comments:
Post a Comment